Many years ago I published on my blog a helper class for working with the Windows console that was wrapping the Windows console API. Looking back at it I realized it was a pretty naive implementation. So I decided to start a new and make something more flexible and easier to use. Hopefully, I was more successful. The result is a small C++ template library called cppconlib, available on codeplex.
cppconlib is built with C++11 features and requires Visual Studio 2012 or newer. The library is available in a single header called conmanip.h and provides a set of helper classes, functions and constants for manipulating a Windows console (using the Windows console functions). The library features the following components:
console_context<T>: represents a context object for console operations; its main purpose is restoring console settings; typedefs for the three consoles are available (console_in_context, console_out_context and console_err_context)
console<T>: represents a console objects providing operations such as changing the foreground and background colors, the input mode, screen buffer size, title, and others; typedefs for the three consoles are available (console_in, console_out and console_err)
manipulating functions that can be used with cout/wcout and cin/wcin: settextcolor()/restoretextcolor(), setbgcolor()/restorebgcolor(), setcolors(), setmode()/clearmode(), setposx()/setposy()/setpos().
The library can be downloaded from here. Detailed documentation is available here.
The following example prints some text in custom colors and then reads text in a different set of colors.
#include "conmanip.h"
using namespace conmanip;
#include <iostream>
int main()
{
// create a console context object, used for restoring console settings
console_out_context ctxout;
// create a console object
console_out conout(ctxout);
// change the title of the console
conout.settitle("cppconlib");
// output text with colors
std::cout
<< settextcolor(console_text_colors::light_yellow)
<< setbgcolor(console_bg_colors::cyan)
<< "This text is colored: ";
// read text with colors
std::string text;
std::cin
>> settextcolor(console_text_colors::cyan)
>> setbgcolor(console_bg_colors::light_yellow)
>> text;
std::cout << std::endl;
// restore console attributes (text and background colors)
ctxout.restore(console_cleanup_options::restore_attibutes);
return 0;
} // -> console settings are restored here when the context object goes out of scope
In WPF, Silverlight and Windows Phone it is possible to render a visual object into a bitmap using the RenderTargetBitmap. This functionality, that I find pretty basic, was not available for Windows Store applications. Fortunately, Windows 8.1 provides that functionality for Windows Store applications too, through the same RenderTargetBitmap class.
There are some limitations though:
it should be used in the code behind (not declared in XAML) because you have to call RenderAsync
collapsed visual objects are not rendered (only visible ones)
in rare circumstances the content can be lost due to the interaction with lower level systems; in this case a specific exception is triggered
the rendered target bitmap does not automatically scale when the current DPI settings change
the maximum rendered size of a XAML visual tree is restricted by the maximum dimensions of a DirectX texture
Here is a demo Windows Store application that has several controls and a button that when pressed a screenshot of the area shown in red (it’s a grid) is taken. The bitmap is saved on disk, but also displayed as the source for the image control shown in the preview area.
SaveScreenshotAsync is an async method that takes the reference to the FrameworkElement to be rendered to a bitmap (in this case the constrolsGrid) and returns a Task<RenderedTargetBitmap> that can be awaited on. As soon as we have the bitmap we set it as the source for the image control (imagePreview).
SaveScreenshotAsync is an async method that takes the FrameworkElement to be rendered to a bitmap and returns a Task<RenderedTargetBitmap> that can be awaited on. This method first prompts the user to select a destination file for the rendered bitmap. When the file is available it calls SaveToFileAsync to rendered the bitmap and write it to the file.
async Task<RenderTargetBitmap> SaveToFileAsync(FrameworkElement uielement, StorageFile file)
{
if (file != null)
{
CachedFileManager.DeferUpdates(file);
Guid encoderId = GetBitmapEncoder(file.FileType);
try
{
using (var stream = await file.OpenAsync(FileAccessMode.ReadWrite))
{
return await CaptureToStreamAsync(uielement, stream, encoderId);
}
}
catch(Exception ex)
{
DisplayMessage(ex.Message);
}
var status = await CachedFileManager.CompleteUpdatesAsync(file);
}
return null;
}
Guid GetBitmapEncoder(string fileType)
{
Guid encoderId = BitmapEncoder.JpegEncoderId;
switch (fileType)
{
case ".bmp":
encoderId = BitmapEncoder.BmpEncoderId;
break;
case ".gif":
encoderId = BitmapEncoder.GifEncoderId;
break;
case ".png":
encoderId = BitmapEncoder.PngEncoderId;
break;
case ".tif":
encoderId = BitmapEncoder.TiffEncoderId;
break;
}
return encoderId;
}
async void DisplayMessage(string error)
{
var dialog = new MessageDialog(error);
await dialog.ShowAsync();
}
SaveToFileAsync is an async method that takes the FrameworkElement to be rendered to a bitmap and the StorageFile when the bitmap is to be saved and returns a Task<RenderedTargetBitmap> that can be awaited on. The file is opened asynchronous for read-write access and the returned IRandomAccessStream is passed further together with the framework element and the bitmap encoder id (that specifies how the bitmap should be encoded, i.e. BMP, JPEG, PNG, GIF, etc.) to CaptureToStreamAsync.
CaptureToStreamAsync creates a new RenderTargetBitmap object and calls RenderAsync to render the visual tree of the framework element to a bitmap. After the bitmap is rendered it retries the image as a buffer of byes in the BGRA8 format. It then asynchronously creates a BitmapEncoder for the IRandomAccessStream stream that it received as an argument, it calls SetPixelData to set the pixels data (notice the BitmapPixelFormat.Bgra8 parameter that matches the pixels format returned by GetPixelsAsync) and later asynchronously flushes all the image data, basically writing it to the file. It then returns that RenderTargetBitmap object that it created, which is used eventually as the source for the image control.
Windows 8 features a Settings charm to display both application (the top part) and system (the bottom part) settings (you get it from swiping from the side of the screen). The system provides two entry points, Permissions and Rate and Review, the later only for applications installed through the store.
You can customize the settings charm by adding new entry points. For instance, you may want to add an About pane. If your application uses network capabilities then you have to add a privacy policy, otherwise your application will not pass the Windows Store Certification.
Image may be NSFW. Clik here to view.Image may be NSFW. Clik here to view.
In this post I will show how you can add new entries to the settings charm for Windows 8.1 applications (this won’t work for Windows 8 applications). We have to use two classes:
SettingsPane: enables the app to control the Settings Charm pane. The app can add or remove commands, receive a notification when the user opens the pane, or open the pane programmatically.
SettingsFlyout: represents a control that provides in-context access to settings that affect the current app. This class is new to Windows 8.1
The following code adds a new entry to the settings pane called Privacy policy and provides a handler for the command. In the handler we create a new instance of a SettingsFlayout and show it.
internal static class PrivacyPolicy
{
public static void Initialise()
{
SettingsPane settingsPane = SettingsPane.GetForCurrentView();
settingsPane.CommandsRequested += (s, e) =>
{
SettingsCommand settingsCommand = new SettingsCommand(
"PRIVACY_ID",
"Privacy policy",
async command =>
{
var flyout = new SettingsFlyout();
flyout.Title = "Privacy policy";
var file = await StorageFile.GetFileFromApplicationUriAsync(
new Uri("ms-appx:///Settings/PrivacyPolicy.txt"));
var properties = await file.GetBasicPropertiesAsync();
var stream = await file.OpenAsync(FileAccessMode.Read);
var reader = new DataReader(stream.GetInputStreamAt(0));
await reader.LoadAsync((uint)properties.Size);
string text = reader.ReadString(reader.UnconsumedBufferLength);
flyout.Content = new TextBlock()
{
Text = text,
TextAlignment = Windows.UI.Xaml.TextAlignment.Left,
TextWrapping = Windows.UI.Xaml.TextWrapping.Wrap,
FontSize = 14
};
flyout.Show();
}
);
e.Request.ApplicationCommands.Add(settingsCommand);
};
}
}
The text of the privacy policy is kept in a text file under the Settings folder. We asynchronously open and read the content of the file and when the text is available we create a new TextBlock control and use it as the content of the flyout content control.
Then we have to initialize the settings pane when the application starts.
protected override void OnLaunched(LaunchActivatedEventArgs e)
{
// ...
// Ensure the current window is active
Window.Current.Activate();
PrivacyPolicy.Initialise();
}
The next sample shows how to add an About page. It’s very similar actually.
internal static class AboutPage
{
public static void Initialise()
{
SettingsPane settingsPane = SettingsPane.GetForCurrentView();
settingsPane.CommandsRequested += (s, e) =>
{
SettingsCommand settingsCommand = new SettingsCommand(
"ABOUT_ID",
"About",
command =>
{
var flyout = new SettingsFlyout();
flyout.Title = "About";
var version = Package.Current.Id.Version;
var versionstring = string.Format("{0}.{1}.{2}.{3}",
version.Major, version.Minor, version.Build, version.Revision);
flyout.Content = new TextBlock()
{
Text = "Created by Marius Bancila\r\nVersion "+
versionstring+
"\r\n\r\nThis is a demo app that shows how to work with Windows Settings Charm.",
TextAlignment = Windows.UI.Xaml.TextAlignment.Left,
TextWrapping = Windows.UI.Xaml.TextWrapping.Wrap,
FontSize = 14
};
flyout.Show();
}
);
e.Request.ApplicationCommands.Add(settingsCommand);
};
}
}
protected override void OnLaunched(LaunchActivatedEventArgs e)
{
// ...
// Ensure the current window is active
Window.Current.Activate();
AboutPage.Initialise();
PrivacyPolicy.Initialise();
}
The content of the flyout can be any visual object (the simple TextBlock is used only for demo purposes). It is also possible to customize the flyout header, icon, background, etc. Here is the same About page with additional flyout settings.
var flyout = new SettingsFlyout();
flyout.Title = "About";
flyout.HeaderBackground = new SolidColorBrush(Colors.DeepSkyBlue);
flyout.HeaderForeground = new SolidColorBrush(Colors.Black);
flyout.IconSource = new BitmapImage(new Uri("ms-appx:///Images/about.png"));
flyout.Background = new SolidColorBrush(Colors.Wheat);
My first Windows Store app (for Window 8.1) is now available in Windows Store. It’s called Your Chemical Name and shows names (and text) using chemical elements symbols in the Breaking Bad style.
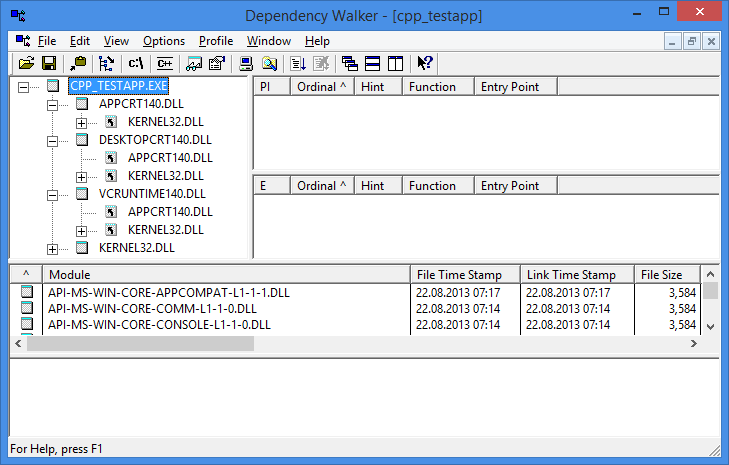
Visual Studio “14” CTP ships with a refactored C Runtime. The first thing you’ll notice is that msvcrXX.dll has been replaced by three new DLLs: appcrtXX.dll, desktopcrtXX.dll and vcruntimeXX.ddl (where XX stands for the version number so in this version it’s appcrt140.dll, desktopcrt140.dll and vcruntime140.dll).
These three new DLLs export run-time routines in different categories, with some of them overlapping, as shown by the bellow table (assembled by directly analyzing the exports of the three modules).
Function
Appcrt140.dll
Desktopcrt140.dll
Vcruntime140.dll
Buffer Manipulation
✓
✓
Byte Classification
✓
✓
Character Classification
✓
✓
Console and Port I/O
✓
Data Alignment
✓
Data Conversion
✓
✓
Debug Routines
✓
✓
Directory Control
✓
✓
Error Handling
✓
✓
Exception Handling
✓
✓
File Handling
✓
Floating-Point Support
✓
Low-Level I/O
✓
Process and Environment Control
✓
✓
✓
Robustness
✓
Searching and Sorting
✓
Stream I/O
✓
String Manipulation
✓
✓
✓
System Calls
✓
Time Management
✓
Breaking CRT routines in several DLLs is not the only change. The CRT has been rewritten for safety and const correctness. Many of the routines have been re-written in C++. Here is a random example: the _open function, that was available in open.c was implemented like this in Visual Studio 2013:
int __cdecl _topen (
const _TSCHAR *path,
int oflag,
...
)
{
va_list ap;
int pmode = 0;
int fh = -1;
errno_t retval = 0;
int unlock_flag = 0;
_VALIDATE_RETURN( (path != NULL), EINVAL, -1);
va_start(ap, oflag);
pmode = va_arg(ap, int);
va_end(ap);
__try {
/* Last parameter passed as 0 because we don't want to
validate pmode from open */
retval = _tsopen_nolock( &unlock_flag,
&fh,
path,
oflag,
_SH_DENYNO,
pmode,
0 );
}
__finally {
if ( unlock_flag )
{
if (retval)
{
_osfile(fh) &= ~FOPEN;
}
_unlock_fh(fh);
}
}
if (retval)
{
errno = retval;
return -1;
}
return fh;
}
In Visual Studio “14” CTP it is available in function appcrt\open.cpp and looks like this:
template <typename Character>
static int __cdecl common_open(
Character const* const path,
int const oflag,
int const pmode
) throw()
{
typedef __crt_char_traits<Character> traits;
_VALIDATE_RETURN(path != nullptr, EINVAL, -1);
int fh = -1;
int unlock_flag = 0;
errno_t error_code = 0;
__try
{
error_code = traits::tsopen_nolock(&unlock_flag, &fh, path, oflag, _SH_DENYNO, pmode, 0);
}
__finally
{
if (unlock_flag)
{
if (error_code)
{
_osfile(fh) &= ~FOPEN;
}
__acrt_lowio_unlock_fh(fh);
}
}
if (error_code != 0)
{
errno = error_code;
return -1;
}
return fh;
}
UPDATE
To read more about the refactoring see the VC++ team’s blog posts:
I recently encountered a problem creating new logins with SQL Server. Something that has worked for years suddenly stopped with the following error:
Password validation failed. The password does not meet Windows policy requirements because it is too short.
Since SQL Server was using Windows local security policy I went and checked that at Security Settings > Account Policies > Password Policy in Local Security Policy (available under Administrative Tools in Control Panel or by opening secpol.msc). As expected, these contained setting that I was not expecting, which were probably changed from the network by a system administrator.
However, I wanted to be able to enter shorter passwords, like 8 characters instead of 10, but this was disabled. Even if I was running as administrator, the option of changing this was disabled.
It is however still possible to modify these settings even if you cannot do it from the management console. You can do it from a command prompt as administrator.
Open a command prompt running as administrator
Run the following command to export the settings to a file. In my example, the target path is c:\temp\local.cfg, but it can be anything.
secedit /export /cfg c:\temp\local.cfg
Edit the file with notepad or another editor. The file is an INI file with sections and key-value pairs. The password settings are available under the [System Access] section. For changing the minimum length of the passwords modify the MinimumPasswordLength key. Image may be NSFW. Clik here to view.
Save the file and run the following command to import the settings from the modified file.
Visual Studio 2017 has been officially launched today. The release notes contain a summary of all the changes available in the new version. This post is focused on the changes for C++ development.
The Visual C++ team has released a series of blog posts to document some of the new features. Here is a list of them:
Of all the changes and new features in VC++ 2017 (that are described in details in the articles mentioned above) there are several that I want to mention:
The C++ compiler is C++14 complete, but still lacks several C++98 and C++11 features. It also contains some features added to C++17.
The standard library implementation contains C++17 features including: any, optional, variant, string_view, make_from_tuple(). The complete list of improvements is available here.
Visual C++ 2017 runtime is compatible to the Visual C++ 2015 runtime. That means you can link to libraries build with VC++ 2015.
The C++ compiler version is 19.1, a minor release of the Visual C++ 2015 compiler (version 19.0). That means _MSC_VER is 1910. On the other hand, MFC and ATL are still on version 14.0 as in Visual C++ 2015. That means _MFC_VER and _ATL_VER ar both 0x0E00.
It is possible to open code from any folder with the Open Folder feature and get IntelliSense, navigation, building, and debugging capabilities without creating a solution and project first.
There is a built-in support for using another C++ compiler, such as Clang or GCC (mainly intended for building projects that target Android, Linux or Mac).
The C++ Core Checkers for enforcing the C++ Core Guidelines are now distributed with Visual Studio.
Installation of Visual Studio has been redesigned. Components are delivered in “workloads”, but individual components can be added or removed. For C++ there are five workloads: Universal Windows Platform development, Desktop Development with C++, Game development with C++, Mobile development with C++, and Linux development with C++.
Installation folder is not c:\Program Files (x86)\Microsoft Visual Studio 15.0 as with previous version, but c:\Program Files (x86)\Microsoft Visual Studio\2017\.
You may have multiple versions of the .NET framework installed and used on your machine. The framework has two components: the set of assemblies that provide functionalities for your application, and the common language runtime (CLR) that handles the execution of the application. These two components are versioned separately. If you what to see what versions of the framework are installed, you have to query the Windows Registry. If you want to know what versions of the CLR are installed you could either use clrver.exe or do it programmatically. In this article, we will look at this later option and how to do it in C++.
To query the installed CLR versions from C++ we have to:
Create an instance of the ICLRMetaHost COM interface, that provides functionality for enumerating installed and loaded runtimes, get a specific runtime and other runtime operations. For this purpose we have to use the CLRCreateInstance function.
In order to call CLRCreateInstance we must include the metahost.h header and link with the Mscoree.lib static library.
To use the ICLRMetaHost and ICLRRuntimeInfo interfaces we must import the mscorlib.tlb type library. The _COM_SMARTPTR_TYPEDEF are used for defining COM smart pointers ICLRMetaHostPtr and ICLRRuntimeInfoPtr that automatically handle the reference counter of the underlying COM object.
The call to the EnumerateInstalledRuntimes method, when successful, returns a pointer to an IEnumUnknown interface. This enables enumerating through a component that contains multiple objects. Its method Next retrieves a specified number of items. In this implementation that number is 1. The return value is a pointer to the IUnknown interface, but what we are enumerating through are actually ICLRRuntimeInfo interfaces.
To retrieve the version info we must use the GetVersionString method of ICLRRuntimeInfo. The arguments are an array of wide characters that will receive the string and the size of the array. In order to retrieve the necessary size of the buffer, we have to first call the method with null for the first argument. In this case the function returns ERROR_INSUFFICIENT_BUFFER as a HRESULT (i.e. HRESULT_FROM_WIN32(ERROR_INSUFFICIENT_BUFFER)) and sets the second argument to the necessary size. After allocating the necessary buffer, we call the method again, providing the buffer and its size.
Running this program on my machine prints the following (which is the same as the output from clrver.exe).
I used to have several open-source projects available on CodePlex. At the end of 2017, the site was put in read-only mode and it will probably be closed at some point. Therefore, I have decided to move the projects that could still be useful to GitHub.
MFC Collection Utilities
A small library that enables developers to use MFC containers (arrays, lists, maps) with range-based for loops. The library consists of a single header that you include in your MFC projects.
#include "mfciterators.h"
void func(CStringArray const & arr)
{
for(auto const & str : arr)
{
// do something with str
}
}
CMap<int, CString> map;
map.SetAt(1, "one");
map.SetAt(2, "two");https://mariusbancila.ro/blog/wp-admin/post-new.php#
map.SetAt(3, "three");
for(auto const & kvp : map)
{
// do something with the key-value pair
TRACE("%d-%s\n", kvp.key, kvp.value);
}
curl is a project containing a command line tool and a library that can be used to transfer data using a variety of protocols, including, of course, HTTP and HTTPS. The library API is written in C, but there are various C++ wrappers on top of it. One of those is curlcpp. In this article, I will show how to build these libraries for Windows with Visual Studio.
Here is how you get this working on Windows using Visual Studio 2017. The following instructions are for 32-bit version, but you can do the same for 64-bit.
Create a subfolder called build in the project’s main folder.
Execute CMake from the build folder to create a Visual Studio solution. Here is an example that assums curl is in the same folder as curlcpp.
cmake -G "Visual Studio 15 2017" .. -DCURL_LIBRARY=..\curl\build\lib\x86\libcurld.lib -DCURL_INCLUDE_DIR=..\curl\include
Open the generated project and build it.
Copy the output to lib\x86 (where lib is a subfolder in the curlcpp project main folder). To be able to have both Debug and Release builds in the same folder rename the Debug build to curlcppd.lib.
For your project using libcurl and curlcpp:
Add CURL_STATICLIB to the preprocessor definitions.
Add curl\include and curlcpp\include to the list of Additional Include Directories. (Make sure you include the correct relative paths.)
Add curl and curlcpp output folders, curl\build\lib\x86 and curlcpp\lib\x86\, to the Additional Library Directories.
Add the following static libraries to the list of Additional dependencies: libcurld.lib;curlcppd.lib;Crypt32.lib;ws2_32.lib;winmm.lib;wldap32.lib;
Attached is a demo project with libcurl and curlcpp builds for both 32 and 64-bit platforms.
Windows 8 features a Settings charm to display both application (the top part) and system (the bottom part) settings (you get it from swiping from the side of the screen). The system provides two entry points, Permissions and Rate and Review, the later only for applications installed through the store.
You can customize the settings charm by adding new entry points. For instance, you may want to add an About pane. If your application uses network capabilities then you have to add a privacy policy, otherwise your application will not pass the Windows Store Certification.
Image may be NSFW. Clik here to view.Image may be NSFW. Clik here to view.
In this post I will show how you can add new entries to the settings charm for Windows 8.1 applications (this won’t work for Windows 8 applications). We have to use two classes:
SettingsPane: enables the app to control the Settings Charm pane. The app can add or remove commands, receive a notification when the user opens the pane, or open the pane programmatically.
SettingsFlyout: represents a control that provides in-context access to settings that affect the current app. This class is new to Windows 8.1
The following code adds a new entry to the settings pane called Privacy policy and provides a handler for the command. In the handler we create a new instance of a SettingsFlayout and show it.
internal static class PrivacyPolicy
{
public static void Initialise()
{
SettingsPane settingsPane = SettingsPane.GetForCurrentView();
settingsPane.CommandsRequested += (s, e) =>
{
SettingsCommand settingsCommand = new SettingsCommand(
"PRIVACY_ID",
"Privacy policy",
async command =>
{
var flyout = new SettingsFlyout();
flyout.Title = "Privacy policy";
var file = await StorageFile.GetFileFromApplicationUriAsync(
new Uri("ms-appx:///Settings/PrivacyPolicy.txt"));
var properties = await file.GetBasicPropertiesAsync();
var stream = await file.OpenAsync(FileAccessMode.Read);
var reader = new DataReader(stream.GetInputStreamAt(0));
await reader.LoadAsync((uint)properties.Size);
string text = reader.ReadString(reader.UnconsumedBufferLength);
flyout.Content = new TextBlock()
{
Text = text,
TextAlignment = Windows.UI.Xaml.TextAlignment.Left,
TextWrapping = Windows.UI.Xaml.TextWrapping.Wrap,
FontSize = 14
};
flyout.Show();
}
);
e.Request.ApplicationCommands.Add(settingsCommand);
};
}
}
The text of the privacy policy is kept in a text file under the Settings folder. We asynchronously open and read the content of the file and when the text is available we create a new TextBlock control and use it as the content of the flyout content control.
Then we have to initialize the settings pane when the application starts.
protected override void OnLaunched(LaunchActivatedEventArgs e)
{
// ...
// Ensure the current window is active
Window.Current.Activate();
PrivacyPolicy.Initialise();
}
The next sample shows how to add an About page. It’s very similar actually.
internal static class AboutPage
{
public static void Initialise()
{
SettingsPane settingsPane = SettingsPane.GetForCurrentView();
settingsPane.CommandsRequested += (s, e) =>
{
SettingsCommand settingsCommand = new SettingsCommand(
"ABOUT_ID",
"About",
command =>
{
var flyout = new SettingsFlyout();
flyout.Title = "About";
var version = Package.Current.Id.Version;
var versionstring = string.Format("{0}.{1}.{2}.{3}",
version.Major, version.Minor, version.Build, version.Revision);
flyout.Content = new TextBlock()
{
Text = "Created by Marius Bancila\r\nVersion "+
versionstring+
"\r\n\r\nThis is a demo app that shows how to work with Windows Settings Charm.",
TextAlignment = Windows.UI.Xaml.TextAlignment.Left,
TextWrapping = Windows.UI.Xaml.TextWrapping.Wrap,
FontSize = 14
};
flyout.Show();
}
);
e.Request.ApplicationCommands.Add(settingsCommand);
};
}
}
protected override void OnLaunched(LaunchActivatedEventArgs e)
{
// ...
// Ensure the current window is active
Window.Current.Activate();
AboutPage.Initialise();
PrivacyPolicy.Initialise();
}
The content of the flyout can be any visual object (the simple TextBlock is used only for demo purposes). It is also possible to customize the flyout header, icon, background, etc. Here is the same About page with additional flyout settings.
var flyout = new SettingsFlyout();
flyout.Title = "About";
flyout.HeaderBackground = new SolidColorBrush(Colors.DeepSkyBlue);
flyout.HeaderForeground = new SolidColorBrush(Colors.Black);
flyout.IconSource = new BitmapImage(new Uri("ms-appx:///Images/about.png"));
flyout.Background = new SolidColorBrush(Colors.Wheat);
My first Windows Store app (for Window 8.1) is now available in Windows Store. It’s called Your Chemical Name and shows names (and text) using chemical elements symbols in the Breaking Bad style.
Visual Studio “14” CTP ships with a refactored C Runtime. The first thing you’ll notice is that msvcrXX.dll has been replaced by three new DLLs: appcrtXX.dll, desktopcrtXX.dll and vcruntimeXX.ddl (where XX stands for the version number so in this version it’s appcrt140.dll, desktopcrt140.dll and vcruntime140.dll).
These three new DLLs export run-time routines in different categories, with some of them overlapping, as shown by the bellow table (assembled by directly analyzing the exports of the three modules).
Function
Appcrt140.dll
Desktopcrt140.dll
Vcruntime140.dll
Buffer Manipulation
✓
✓
Byte Classification
✓
✓
Character Classification
✓
✓
Console and Port I/O
✓
Data Alignment
✓
Data Conversion
✓
✓
Debug Routines
✓
✓
Directory Control
✓
✓
Error Handling
✓
✓
Exception Handling
✓
✓
File Handling
✓
Floating-Point Support
✓
Low-Level I/O
✓
Process and Environment Control
✓
✓
✓
Robustness
✓
Searching and Sorting
✓
Stream I/O
✓
String Manipulation
✓
✓
✓
System Calls
✓
Time Management
✓
Breaking CRT routines in several DLLs is not the only change. The CRT has been rewritten for safety and const correctness. Many of the routines have been re-written in C++. Here is a random example: the _open function, that was available in open.c was implemented like this in Visual Studio 2013:
int __cdecl _topen (
const _TSCHAR *path,
int oflag,
...
)
{
va_list ap;
int pmode = 0;
int fh = -1;
errno_t retval = 0;
int unlock_flag = 0;
_VALIDATE_RETURN( (path != NULL), EINVAL, -1);
va_start(ap, oflag);
pmode = va_arg(ap, int);
va_end(ap);
__try {
/* Last parameter passed as 0 because we don't want to
validate pmode from open */
retval = _tsopen_nolock( &unlock_flag,
&fh,
path,
oflag,
_SH_DENYNO,
pmode,
0 );
}
__finally {
if ( unlock_flag )
{
if (retval)
{
_osfile(fh) &= ~FOPEN;
}
_unlock_fh(fh);
}
}
if (retval)
{
errno = retval;
return -1;
}
return fh;
}
In Visual Studio “14” CTP it is available in function appcrt\open.cpp and looks like this:
template <typename Character>
static int __cdecl common_open(
Character const* const path,
int const oflag,
int const pmode
) throw()
{
typedef __crt_char_traits<Character> traits;
_VALIDATE_RETURN(path != nullptr, EINVAL, -1);
int fh = -1;
int unlock_flag = 0;
errno_t error_code = 0;
__try
{
error_code = traits::tsopen_nolock(&unlock_flag, &fh, path, oflag, _SH_DENYNO, pmode, 0);
}
__finally
{
if (unlock_flag)
{
if (error_code)
{
_osfile(fh) &= ~FOPEN;
}
__acrt_lowio_unlock_fh(fh);
}
}
if (error_code != 0)
{
errno = error_code;
return -1;
}
return fh;
}
UPDATE
To read more about the refactoring see the VC++ team’s blog posts:
I recently encountered a problem creating new logins with SQL Server. Something that has worked for years suddenly stopped with the following error:
Password validation failed. The password does not meet Windows policy requirements because it is too short.
Since SQL Server was using Windows local security policy I went and checked that at Security Settings > Account Policies > Password Policy in Local Security Policy (available under Administrative Tools in Control Panel or by opening secpol.msc). As expected, these contained setting that I was not expecting, which were probably changed from the network by a system administrator.
However, I wanted to be able to enter shorter passwords, like 8 characters instead of 10, but this was disabled. Even if I was running as administrator, the option of changing this was disabled.
It is however still possible to modify these settings even if you cannot do it from the management console. You can do it from a command prompt as administrator.
Open a command prompt running as administrator
Run the following command to export the settings to a file. In my example, the target path is c:\temp\local.cfg, but it can be anything.
secedit /export /cfg c:\temp\local.cfg
Edit the file with notepad or another editor. The file is an INI file with sections and key-value pairs. The password settings are available under the [System Access] section. For changing the minimum length of the passwords modify the MinimumPasswordLength key. Image may be NSFW. Clik here to view.
Save the file and run the following command to import the settings from the modified file.
Visual Studio 2017 has been officially launched today. The release notes contain a summary of all the changes available in the new version. This post is focused on the changes for C++ development.
The Visual C++ team has released a series of blog posts to document some of the new features. Here is a list of them:
Of all the changes and new features in VC++ 2017 (that are described in details in the articles mentioned above) there are several that I want to mention:
The C++ compiler is C++14 complete, but still lacks several C++98 and C++11 features. It also contains some features added to C++17.
The standard library implementation contains C++17 features including: any, optional, variant, string_view, make_from_tuple(). The complete list of improvements is available here.
Visual C++ 2017 runtime is compatible to the Visual C++ 2015 runtime. That means you can link to libraries build with VC++ 2015.
The C++ compiler version is 19.1, a minor release of the Visual C++ 2015 compiler (version 19.0). That means _MSC_VER is 1910. On the other hand, MFC and ATL are still on version 14.0 as in Visual C++ 2015. That means _MFC_VER and _ATL_VER ar both 0x0E00.
It is possible to open code from any folder with the Open Folder feature and get IntelliSense, navigation, building, and debugging capabilities without creating a solution and project first.
There is a built-in support for using another C++ compiler, such as Clang or GCC (mainly intended for building projects that target Android, Linux or Mac).
The C++ Core Checkers for enforcing the C++ Core Guidelines are now distributed with Visual Studio.
Installation of Visual Studio has been redesigned. Components are delivered in “workloads”, but individual components can be added or removed. For C++ there are five workloads: Universal Windows Platform development, Desktop Development with C++, Game development with C++, Mobile development with C++, and Linux development with C++.
Installation folder is not c:\Program Files (x86)\Microsoft Visual Studio 15.0 as with previous version, but c:\Program Files (x86)\Microsoft Visual Studio\2017\.
You may have multiple versions of the .NET framework installed and used on your machine. The framework has two components: the set of assemblies that provide functionalities for your application, and the common language runtime (CLR) that handles the execution of the application. These two components are versioned separately. If you what to see what versions of the framework are installed, you have to query the Windows Registry. If you want to know what versions of the CLR are installed you could either use clrver.exe or do it programmatically. In this article, we will look at this later option and how to do it in C++.
To query the installed CLR versions from C++ we have to:
Create an instance of the ICLRMetaHost COM interface, that provides functionality for enumerating installed and loaded runtimes, get a specific runtime and other runtime operations. For this purpose we have to use the CLRCreateInstance function.
In order to call CLRCreateInstance we must include the metahost.h header and link with the Mscoree.lib static library.
To use the ICLRMetaHost and ICLRRuntimeInfo interfaces we must import the mscorlib.tlb type library. The _COM_SMARTPTR_TYPEDEF are used for defining COM smart pointers ICLRMetaHostPtr and ICLRRuntimeInfoPtr that automatically handle the reference counter of the underlying COM object.
The call to the EnumerateInstalledRuntimes method, when successful, returns a pointer to an IEnumUnknown interface. This enables enumerating through a component that contains multiple objects. Its method Next retrieves a specified number of items. In this implementation that number is 1. The return value is a pointer to the IUnknown interface, but what we are enumerating through are actually ICLRRuntimeInfo interfaces.
To retrieve the version info we must use the GetVersionString method of ICLRRuntimeInfo. The arguments are an array of wide characters that will receive the string and the size of the array. In order to retrieve the necessary size of the buffer, we have to first call the method with null for the first argument. In this case the function returns ERROR_INSUFFICIENT_BUFFER as a HRESULT (i.e. HRESULT_FROM_WIN32(ERROR_INSUFFICIENT_BUFFER)) and sets the second argument to the necessary size. After allocating the necessary buffer, we call the method again, providing the buffer and its size.
Running this program on my machine prints the following (which is the same as the output from clrver.exe).
I used to have several open-source projects available on CodePlex. At the end of 2017, the site was put in read-only mode and it will probably be closed at some point. Therefore, I have decided to move the projects that could still be useful to GitHub.
MFC Collection Utilities
A small library that enables developers to use MFC containers (arrays, lists, maps) with range-based for loops. The library consists of a single header that you include in your MFC projects.
#include "mfciterators.h"
void func(CStringArray const & arr)
{
for(auto const & str : arr)
{
// do something with str
}
}
CMap<int, CString> map;
map.SetAt(1, "one");
map.SetAt(2, "two");http://mariusbancila.ro/blog/wp-admin/post-new.php#
map.SetAt(3, "three");
for(auto const & kvp : map)
{
// do something with the key-value pair
TRACE("%d-%s\n", kvp.key, kvp.value);
}
curl is a project containing a command line tool and a library that can be used to transfer data using a variety of protocols, including, of course, HTTP and HTTPS. The library API is written in C, but there are various C++ wrappers on top of it. One of those is curlcpp. In this article, I will show how to build these libraries for Windows with Visual Studio.
Here is how you get this working on Windows using Visual Studio 2017. The following instructions are for 32-bit version, but you can do the same for 64-bit.
Create a subfolder called build in the project’s main folder.
Execute CMake from the build folder to create a Visual Studio solution. Here is an example that assums curl is in the same folder as curlcpp.
cmake -G "Visual Studio 15 2017" .. -DCURL_LIBRARY=..\curl\build\lib\x86\libcurld.lib -DCURL_INCLUDE_DIR=..\curl\include
Open the generated project and build it.
Copy the output to lib\x86 (where lib is a subfolder in the curlcpp project main folder). To be able to have both Debug and Release builds in the same folder rename the Debug build to curlcppd.lib.
For your project using libcurl and curlcpp:
Add CURL_STATICLIB to the preprocessor definitions.
Add curl\include and curlcpp\include to the list of Additional Include Directories. (Make sure you include the correct relative paths.)
Add curl and curlcpp output folders, curl\build\lib\x86 and curlcpp\lib\x86\, to the Additional Library Directories.
Add the following static libraries to the list of Additional dependencies: libcurld.lib;curlcppd.lib;Crypt32.lib;ws2_32.lib;winmm.lib;wldap32.lib;
Attached is a demo project with libcurl and curlcpp builds for both 32 and 64-bit platforms.